New AART – friction coefficient does not fit, abrasiveness does not fit – what now?
The first days and weeks after commissioning a new AART or a new track can be somewhat frustrating because the friction coefficient and abrasiveness of the track can still change considerably, especially in the start-up phase.
We have calibrated the track as best as possible ex works, i.e. in an elaborate process we have chiselled out the friction ring with the stocker tool, aligned the track in the AART and then machined it with a chisel, wire brush, sandpaper and nylon brush so that the friction value and abrasiveness of the track meet the specifications according to EN17092:2020. This is documented in the calibration report of the track. Nevertheless, our experience shows that a constant behaviour only emerges after some time.
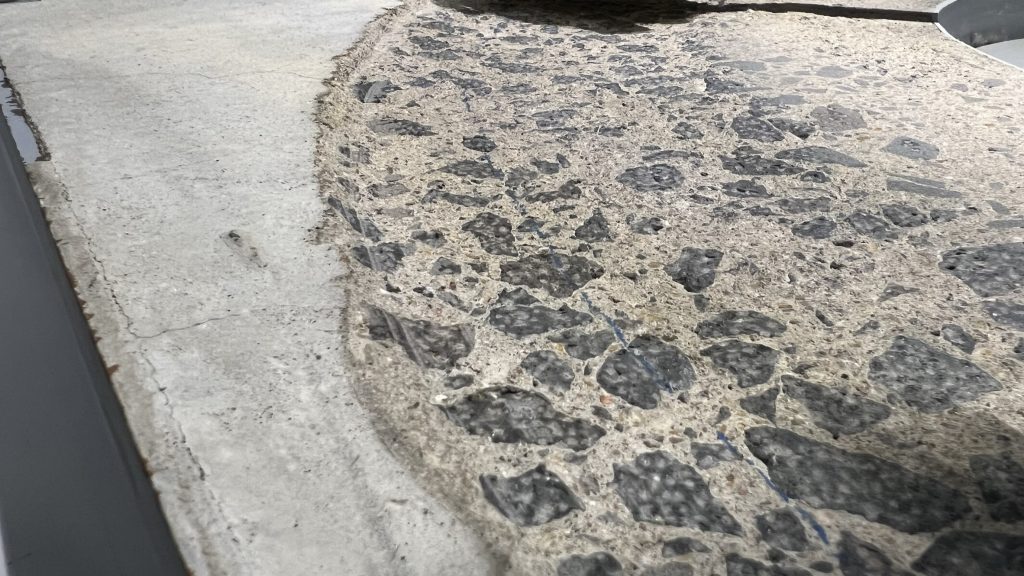
Why is this so? The Darmstadt method is based on the friction process between the protective clothing to be tested and a realistic concrete roadway. This consists of stone parts of different grain sizes and is bound by concrete, which consists of sand and cement. It is precisely the concrete components that continue to sand out for a long time and reduce the coefficient of friction. This is a process that unfortunately cannot be changed. Smaller stones will also break out of the pavement during the start-up phase and change the abrasiveness of it.
You can favour this natural and desired ageing process if you rub the friction ring of the roadway vigorously with a nylon brush before each test and thoroughly vacuum up the loosened sand and dust with a hoover.
In the following, we would like to give you a few tips on how to make friend with your new AART as quickly as possible 😊
Recommended equipment for operating the AART – what do I really need?
Especially in the starting phase, it is important to be able to work on the friction ring of the road surface. We therefore recommend some equipment to make your work easier.
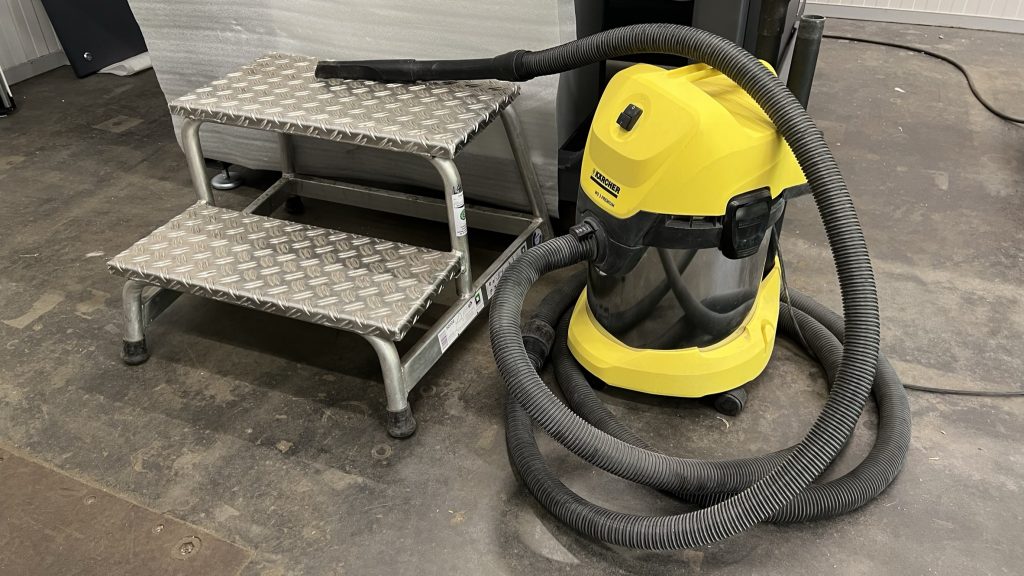
Road maintenance equipment

Mounting step and hoover
By using a mounting step, you can also easily reach the rear area of the AART from the front and, for example, complete the road cleaning in one step from the front.
In case of errors, always check prerequisites first
If the friction value or abrasiveness with the reference material Cotton Canvas are outside the defined range (µ = 0.52 ± 0.05, pass@354rpm, fail@413rpm), then we recommend always performing three shots according to EN17092-1 (chap. 5.4.5.2, tab. 6) for evaluation, so that the specimens have been tested in each orientation on each sample holder. This is the only way to see whether all specimen arms work in the same way, whether the material damage depends essentially on the orientation (0°, 45°, 90°) as expected, and whether the coefficient of friction and material damage remain constant at least over the three shots.
Please do not fall into actionism too quickly. It is possible that only a light layer of sand has formed, which can be removed by cleaning.
Always check first:
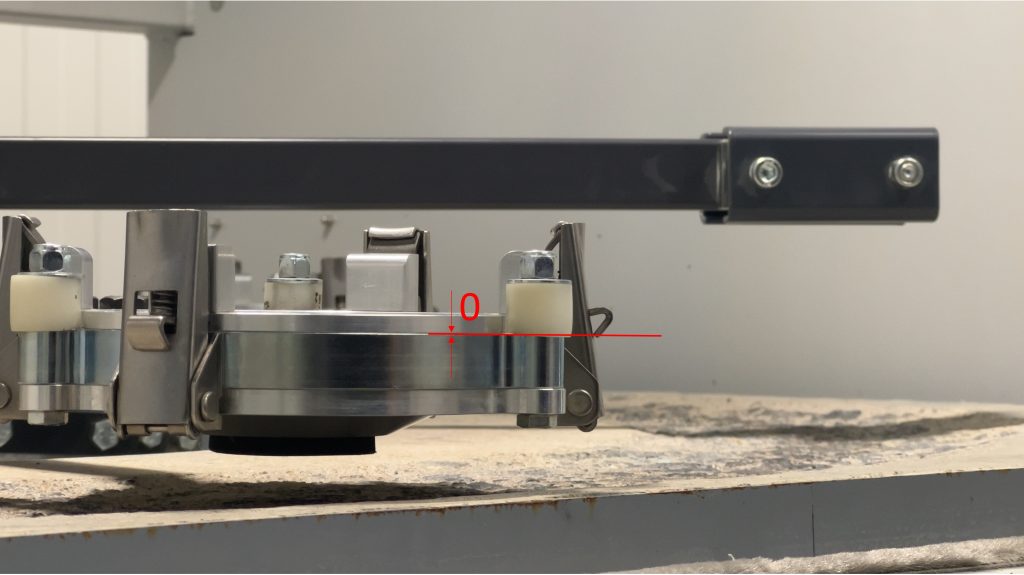
- Is the dropping height set correctly to 10mm? If not: Adjust
- Are the rubber buffers well rubbed in?
- Do all quick-release fasteners grip correctly (no gap above the sample holder)? If no: Adjust the quick-release fasteners.
If you are still convinced after the check that you need to change something on the AART or the lane, then we strongly recommend never to change several parameters at the same time during the steps described here!
How do I set the quick-release fasteners correctly?
When adjusting the quick-release fasteners, turn the locking hook to close direction until the lever can no longer be closed and then turn the hook back one turn. See video.
If your fabrics material is very difficult to clamp afterwards, reduce the pretensioning force of the three screws.
It is important that after adjustment the cover of the sample holder rests on the holder without a gap in the clamped state, as shown in the picture:
Cleaning the surface with the nylon brush
After each test, the friction ring should be thoroughly rubbed with the nylon brush and vacuumed. See video.
After all work on the friction ring (e.g. with chisels, stocker tools, sandpaper, rubbing in rubber buffers, etc.) or after testing staining or sticking materials, we recommend cleaning the track with a shot of Para Aramid (3 layers, 354rpm).
How do I reduce the coefficient of friction?
Here we say coution twice!
Caution 1: Congratulations! First do nothing! A high friction value is not a bad condition, as it will decrease by itself – at least on new road surfaces. If necessary, 5-10 shots might help!
Caution 2: As long as cotton canvas fails and the underlying para aramid comes into significant contact with the road surface, you must not rely on the measured friction value. The 0.52 specification only applies to Cotton! You should then first try to lower the abrasiveness. You will then observe that the coefficient of friction decreases by itself due to the sanding out described above.
Sanding the friction ring with sandpaper should only be used as a last resort if the friction value does not decrease even after many tests.
Use of sandpaper: Cut or tear out a piece of 180-grit sandpaper about three fingers wide and palms long. Press the sandpaper onto the friction ring with the three middle fingers and circle it evenly along the roadway with a diameter of about 5 cm for about a quarter of the friction ring, after which the paper is used up. Then turn the sandpaper so that the fresh area is under your three fingers and circle the same quarter of the friction ring back again. Repeat the process with freshly cut sandpaper for the next three quarters of the friction ring.
Afterwards, you should thoroughly clean the track with a nylon brush and hoover and check the friction value.
How do I increase the coefficient of friction?
If you measure a friction value that is too low, first check whether the road surface is free of abraded sand. If in doubt, please clean thoroughly again. As a rule, the low coefficient of friction is due to sanding of the road surface. You can roughen the sandy concrete parts with a steel brush. Work the entire friction ring radially with the steel brush. See video.
Afterwards, please clean the road thoroughly with a nylon brush and hoover before checking the friction value with Cotton Canvas.
If this does not raise the friction coefficient sufficiently, repeat the procedure with the steel brush. Increase the pressure on the brush and try to vary the brushing direction.
In the course of time (weeks, months, several hundred shots), the sandy concrete areas are largely worn or sanded out, so that the rubbing process takes place almost exclusively on the coarser stones. The steel brush can then no longer make a significant contribution.
Only when about 10 applications of the steel brush do not lead to the desired success you should switch to work the roadway with the stocker tool (see video). We strongly recommend NOT to rework the entire friction ring, but first only a few protruding areas, which you can mark in black with the rubber buffers.
Attention:
Please note, however, that you will remove the upper layers of the load-bearing stones when working extensively with the stocker tool. This will also cause the abrasiveness to readjust and sandy concrete components will now come into play again. You are practically starting again with your roadway in its original condition. You should now also consider rubbing in new rubber buffers.
How do I reduce the abrasiveness?
If the reference material fails several times at 354rpm despite the correct friction value (hole, opening >= 5mm) then you must reduce the abrasiveness. First of all, you should scan the entire friction ring with the palm of your hand in the direction of friction and work on any protruding stones or sharp edges with a hammer and chisel. See video.
If this does not bring the desired success, then you can also use the sharp chisel to scrape across the roadway in the direction of friction with stochastic movements quickly, lightly but without much pressure. See also here Video.
How do I increase the abrasiveness?
If the Cotton Canvas reference material consistently fails to produce a “fail” at 413rpm, then you need to think about machining the friction ring with the Stocker tool as described in “How do I increase the friction value?
The friction ring in my concrete tile is not parallel to the surface, is that OK?
We always try to rub the friction ring parallel to the road surface. However, this is often not possible. Freshly cast roadways have a very smooth surface with a fine structure. The larger stones specified in ZTV StB 07 sink during the production process and must be exposed by removing the fine surface layer using a stocker tool. If the entire friction ring is exposed, then we have to make sure that there are also coarser stone structures around the entire circumference and not just concrete. In most roadways, however, the structures are not tightly under the surface over the entire circumference, so that a deeper partial exposure is then necessary. This cannot be changed due to the process, but has no influence on the function of the machine, as the roadway is aligned in the device so that the friction ring is orthogonal to the axis of rotation of the sample star.
Which power connection is required?
The AART requires a CEE socket (32 A, 400 V, 3L+N+PE, 50Hz).

What should be considered if my subdistribution has a residual current circuit breaker?
Frequency converters typically generate high frequencies and harmonics caused by pulse width modulation (PWM). Standard Type A residual current circuit breakers are designed for frequencies around 50 Hz and may become unreliable at higher frequencies or with harmonics. Therefore, it is recommended to use a so-called ‘universal’ residual current circuit breaker of Type B or Type B+, which is designed for frequencies up to several kHz and can detect all types of fault currents (DC, AC, pulsed DC).